If you come from Xamarin.Forms, you probably remember custom renderers: the mechanism you used to reach into a native control and tweak it. In .NET MAUI, renderers are gone. In their place we have handlers — a lighter, faster, and more decoupled way to bridge a cross-platform control to its native counterpart on each platform.
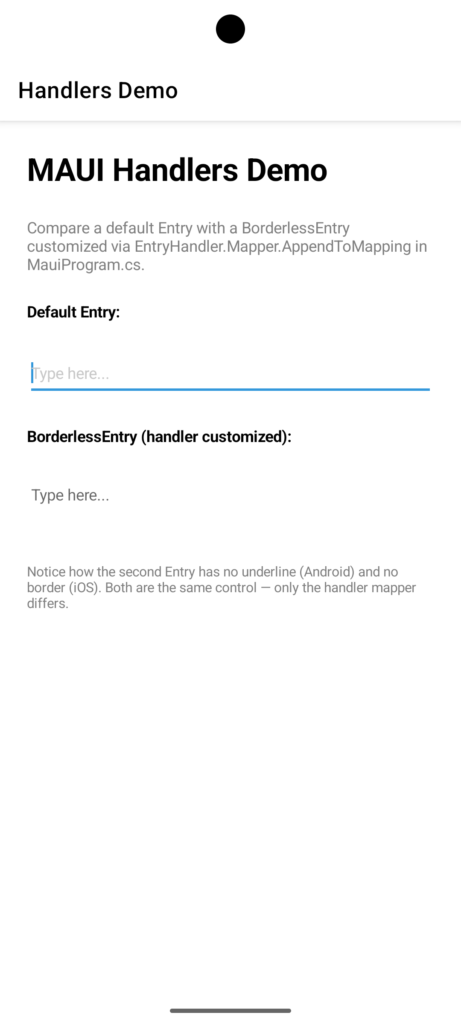
In this post we’ll cover what handlers are, how the mapper pattern works, and finish with a practical example: customizing the Entry control on Android and iOS to remove its underline/border.
What is a handler?
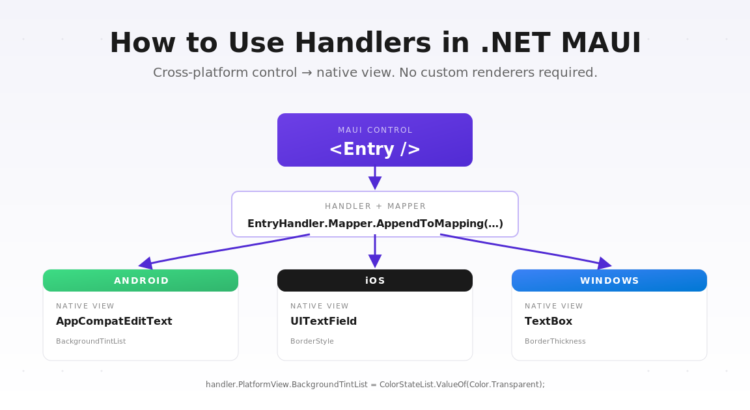
A handler is the object responsible for creating and configuring the native view that corresponds to a MAUI cross-platform control. Every MAUI control (Button, Entry, Label, etc.) has a matching handler on each platform:
ButtonHandleron Android wrapsAppCompatButton.ButtonHandleron iOS wrapsUIButton.ButtonHandleron Windows wrapsMicrosoft.UI.Xaml.Controls.Button.
When you place a <Button /> in XAML, MAUI asks the handler for the current platform to produce a native view and keep it in sync with the properties of the cross-platform control.
The mapper pattern
Handlers do not use inheritance to react to property changes. Instead, each handler exposes a static property mapper and a command mapper. These are dictionaries that connect a cross-platform property (like Text or TextColor) to a static method that knows how to apply that value to the native view.
// Simplified view of how MAUI defines a mapper internally
public static IPropertyMapper<IEntry, IEntryHandler> Mapper = new PropertyMapper<IEntry, IEntryHandler>(ViewHandler.ViewMapper)
{
    [nameof(IEntry.Text)]      = MapText,
    [nameof(IEntry.TextColor)] = MapTextColor,
    // ...
};
The big advantage: to change how a property is applied, you don’t have to subclass anything. You just modify the mapper — either globally, or only when you need it.
Practical example: remove the underline on Entry
By default, the MAUI Entry control shows an underline on Android and a border/background on iOS. Let’s customize the handler so no Entry in the app shows those decorations.
1. Register the customization
The best place to hook into the mapper is in MauiProgram.cs, using ConfigureMauiHandlers and the Microsoft.Maui.Handlers namespace:
using Microsoft.Maui.Handlers;

public static class MauiProgram
{
    public static MauiApp CreateMauiApp()
    {
        var builder = MauiApp.CreateBuilder();
        builder
            .UseMauiApp<App>()
            .ConfigureFonts(fonts =>
            {
                fonts.AddFont("OpenSans-Regular.ttf", "OpenSansRegular");
            });

#if ANDROID
        EntryHandler.Mapper.AppendToMapping("NoUnderline", (handler, view) =>
        {
            handler.PlatformView.BackgroundTintList =
                Android.Content.Res.ColorStateList.ValueOf(Android.Graphics.Color.Transparent);
        });
#elif IOS
        EntryHandler.Mapper.AppendToMapping("NoBorder", (handler, view) =>
        {
            handler.PlatformView.BorderStyle = UIKit.UITextBorderStyle.None;
        });
#endif

        return builder.Build();
    }
}
AppendToMapping adds a new step that runs after the default mapping. Inside the lambda:
handler.PlatformViewis the native control —EditTexton Android,UITextFieldon iOS.viewis the cross-platformEntryinstance.
2. Only customize some entries
What if you only want the customization on some entries? Combine the mapper with a subclass or an attached property, and check inside the lambda:
public class BorderlessEntry : Entry { }

#if ANDROID
EntryHandler.Mapper.AppendToMapping("NoUnderline", (handler, view) =>
{
    if (view is BorderlessEntry)
    {
        handler.PlatformView.BackgroundTintList =
            Android.Content.Res.ColorStateList.ValueOf(Android.Graphics.Color.Transparent);
    }
});
#endif
Now only <local:BorderlessEntry /> instances lose the underline — everything else keeps the default look.
Mapper methods you should know
AppendToMapping— run additional code after the default mapping. Best when you want to extend behavior.PrependToMapping— run code before the default mapping.ModifyMapping— fully replace the default handling of a property. Use with care — you own the outcome.
When should I write my own handler?
For most cases, adjusting the mapper is enough. You only need a custom handler class when you’re building a brand new cross-platform control that wraps a native view MAUI doesn’t already ship — for example, a native map component or a third-party widget. In that case you’d derive from ViewHandler<TVirtualView, TPlatformView> and define your own mapper.
Wrapping up
Handlers make MAUI customizations much more surgical than Xamarin.Forms renderers ever were. Instead of subclassing an entire renderer just to change one property, you append a small lambda to a mapper and you’re done. The mental model is simple: cross-platform control → mapper → native view.
If this is your first time touching handlers, start by adding a single AppendToMapping in MauiProgram.cs and inspect what handler.PlatformView gives you on each platform. Once that clicks, the rest of the API falls into place.
Repository
MauiHandlersDemoTest View